Report Scheduler
Reports > Report Scheduler
Report Scheduler allows the automation of report generation via platform, email, or FTP site. Any report can be scheduled, including Letters.
NOTE: A Report Template for the desired report must be created prior to creating a Report Schedule to run that report.

-
Search - search by template name
-
All Job Types - filter by job type (All Job Types (default), Report Template Group, Report Template)
-
Include Inactive - check to include inactive report schedules in results
-
Reset - click to reset search parameters
-
Add New Schedule - click to add a new report schedule. See Step 17 for details.
-
Advanced - click to open additional filter options
-
User - filter by user
-
Show All Users - check to show report schedules created by all users. Only the current user's templates are displayed by default.
-
Search - click to apply advanced filters
-
Created By - sort by name of the user who created the template
-
Name - click to sort by report template name
-
Schedule Type - click to sort by schedule type (Report Template, Report Template Group)
-
Schedule - click to sort by the schedule
-
Last Run Date - notice the last run date and time
-
Next Run Date - notice the next scheduled date and time
-
Active - click to sort by active status
-
Pencil - click to edit an existing template
-
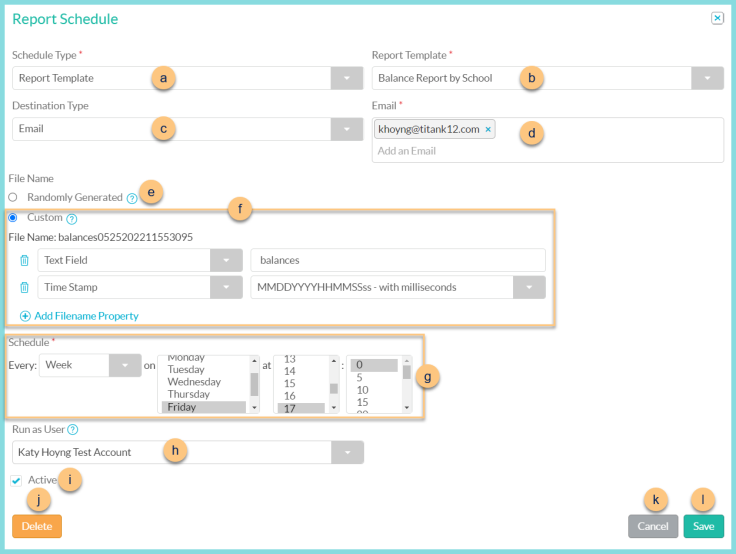
Schedule Type - select the schedule type (Report Template, Report Template Group)
-
Report Template - select the report template to schedule
Report Template Group (not pictured) - select the Report Template Group to schedule -
Destination Type - select the destination type
Blank - the report will appear in the bell of the run as user
FTP - the report will be uploaded to the designated FTP site
Email - the report will be emailed to the designated address(es) -
Email (email type only) - enter the email address(es) separated by a space. Note: The email domain must match the district email domain(s)
Url (not pictured, FTP type only) - enter the FTP URL
Username (not pictured, FTP type only) - enter the username to access the FTP URL
Password (not pictured, FTP type only) - enter the password to access the FTP URL -
Randomly Generated - select for a randomly generated file name
-
Custom - select to choose custom options for the file name. Click (+) Add Filename Property to select options (Text Field, Report Name, or Time Stamp).
-
Schedule - select the Every frequency of the job (Hour, Day, Week, Month, Year) then select the corresponding month(s), date(s), day(s), hour(s), and minute(s) based on the frequency chosen. Note: Hold down the CTRL key to select multiple options per field.
-
Run As User - select the user whose security rights are used to run the scheduled report
-
Active - toggle active status
-
Delete - click to delete the schedule
-
Cancel - click to return to the previous screen without saving changes
-
Save - click to save changes
-
< > - click to scroll through pages